How to Deploy a HA Kubernetes Cluster with kubeadm on Ubuntu16
Kubernetes is one of the most popular open source container orchestration systems. It’s used to manage the whole life of containerized applications, including deployment, scaling, upgrading etc.
Sometimes you may want a Kubernetes cluster to test an application or to create a development environment quickly and easily. Kubernetes community created a tool named Kubeadm for this purpose. It greatly simplified Kubernetes deployment process . This article demonstrate how to create a simple Kubernetes cluster, which is able to pass Kubernetes Conformance tests, using Kubeadm.
Architecture Designing
Our example cluster consists of 5 servers in an internal network 192.168.100.0/24. Out of the 5 servers, three will be the masters nodes with IPs 192.168.100.10, 192.168.100.20, 192.168.100.30, respectively. The other two will be worker nodes and have the IPs 192.168.100.40 and 192.168.100.50. 192.168.100.60 is used as a virtual IP for Master services. You can choose to different IPs according to your own network environment.
Here is the server inventory and architecture

Prerequisites
The servers could be bare-metal servers or virtual servers. They have the following requirements:
- Each server has at least 2 CPU/vCPU cours, 4GB RAM and 10GB disk space.
- All servers must have Internet access in order to download software packages.
- Operating System on them is Ubuntu 16.04 LTS with root user enabled
Preparing Servers
There are a few things to be done to get the servers ready. You need to perform the following task on all servers
1. Disable swap
$ sudo swapoff -a
$ sudo sed -i 's/^.*swap/#&/' /etc/fstab
2. Configure iptables to enable forwarding of incoming packets
$ sudo iptables -P FORWARD ACCEPT

# cat <  /etc/sysctl.d/k8s.conf
net.bridge.bridge-nf-call-ip6tables = 1
net.bridge.bridge-nf-call-iptables = 1
net.ipv4.ip_forward = 1
vm.swappiness=0
EOF

# sysctl --system
Edit /etc/hosts file to contain the following:
master01 192.168.100.10
master02 192.168.100.20
master03 192.168.100.30
3. Install and configure Docker
# wget https://download.docker.com/linux/static/stable/x86_64/docker-17.03.2-ce.tgz
# tar -zxvf docker-17.03.2-ce.tgz
# cd docker
# cp * /usr/local/bin/
Change the content of /etc/systemd/system/docker.service to the following
[Unit]
Description=Docker Application Container Engine
Documentation=http://docs.docker.io

[Service]
ExecStart=/usr/local/bin/dockerd
ExecStartPost=/sbin/iptables -I FORWARD -s 0.0.0.0/0 -j ACCEPT
ExecReload=/bin/kill -s HUP $MAINPID
Restart=on-failure
RestartSec=5
LimitNOFILE=infinity
LimitNPROC=infinity
LimitCORE=infinity
Delegate=yes
KillMode=process

[Install]
WantedBy=multi-user.target
Enable Docker service and reload configuration by running the following commands
# systemctl daemon-reload
# systemctl enable docker
# systemctl restart docker
4. Install kubeadm, kubectl and kubelet
# curl -s https://packages.cloud.google.com/apt/doc/apt-key.gpg | apt-key add
# echo "deb http://apt.kubernetes.io/ kubernetes-xenial main"|tee /etc/apt/sources.list.d/kubernetes.list
# apt-get update
# apt-get install -y kubelet=1.10.0-00 kubectl=1.10.0-00 kubeadm=1.10.0-00
Setting Up Kubernetes Cluster
Generating Master Configuration Files
We generate one set of configuration files on Master01(192.168.100.10) and copy them onto all Master nodes.
Download Cloudflare's PKI and TLS toolkit
# curl -o /usr/local/bin/cfssl https://pkg.cfssl.org/R1.2/cfssl_linux-amd64
# curl -o /usr/local/bin/cfssljson https://pkg.cfssl.org/R1.2/cfssljson_linux-amd64
# chmod +x /usr/local/bin/cfssl*
Create a certificates folder
# mkdir /opt/ssl
Create a certificate configuration file /opt/ssl/ca-config.json with following content
{
    "signing":
    {
        "default": {
        "expiry": "87600h"
        },
        "profiles": {
        "kubernetes": {
            "usages": [
                "signing",
                "key encipherment",
                "server auth",
                "client auth"
            ],
            "expiry": "87600h"
        }
        }
    }
}

vi ca-csr.json
    {
        "CN": "kubernetes",
        "key": {
            "algo": "rsa",
            "size": 2048
        },
        "names": [
            {
            "C": "US",
            "ST": "TX",
            "L": "dallas",
            "O": "k8s",
            "OU": "System"
            }
        ]
    }

vi etcd-csr.json
    {
    "CN": "etcd",
    "hosts": [
            "127.0.0.1",
            "192.168.100.10",
            "192.168.100.20",
            "192.168.100.30"
        ],
        "key": {
            "algo": "rsa",
            "size": 2048
        },
        "names": [
            {
            "C": "US",
            "ST": "TX",
            "L": "dallas",
            "O": "k8s",
            "OU": "System"
            }
        ]
    }
Generate certificates
# cd /opt/ssl/ca-config.json
# cfssl gencert -initca ca-csr.json | cfssljson -bare ca
# cfssl gencert -ca=ca.pem -ca-key=ca-key.pem -config=ca-config.json -profile=kubernetes etcd-csr.json | cfssljson -bare etcd
Copy Configuration Files to Installation Folder
To copy configuration files generated in the last step to installation folder, you need to perform the following tasks on all 3 Master nodes.
Create the certificate folder
# mkdir -p /etc/etcd/ssl
Create the etcd data director
# mkdir -p /var/lib/etcd
Copy etcd certificates from master node “Master01”
# scp -rp 192.168.100.10:/opt/ssl/*.pem /etc/etcd/ssl/
Install etcd
# wget https://github.com/coreos/etcd/releases/download/v3.3.4/etcd-v3.3.4-linux-amd64.tar.gz
# tar -zxvf etcd-v3.3.4-linux-amd64.tar.gz
# cp etcd-v3.3.4-linux-amd64/etcd* /usr/local/bin/
Setting Up ETCD Cluster
On Master01:Create file /etc/systemd/system/etcd.service with the following content
[Unit]
Description=Etcd Server
After=network.target
After=network-online.target
Wants=network-online.target
Documentation=https://github.com/coreos

[Service]
Type=notify
WorkingDirectory=/var/lib/etcd/
ExecStart=/usr/local/bin/etcd \
--name=master01 \
--cert-file=/etc/etcd/ssl/etcd.pem \
--key-file=/etc/etcd/ssl/etcd-key.pem \
--peer-cert-file=/etc/etcd/ssl/etcd.pem \
--peer-key-file=/etc/etcd/ssl/etcd-key.pem \
--trusted-ca-file=/etc/etcd/ssl/ca.pem \
--peer-trusted-ca-file=/etc/etcd/ssl/ca.pem \
--initial-advertise-peer-urls=https://192.168.100.10:2380 \
--listen-peer-urls=https://192.168.100.10:2380 \
--listen-client-urls=https://192.168.100.10:2379,http://127.0.0.1:2379 \
--advertise-client-urls=https://192.168.100.10:2379 \
--initial-cluster-token=etcd-cluster-0 \
--initial-cluster=master01=https://192.168.100.10:2380,master02=https://192.168.100.20:2380,master03=https://192.168.100.30:2380\
--initial-cluster-state=new \
--data-dir=/var/lib/etcd
Restart=on-failure
RestartSec=5
LimitNOFILE=65536

[Install]
WantedBy=multi-user.target
Start etcd service
systemctl daemon-reload && systemctl enable etcd && systemctl start etcd
On Master02
Create file /etc/systemd/system/etcd.service with the following content
[Unit]
Description=Etcd Server
After=network.target
After=network-online.target
Wants=network-online.target
Documentation=https://github.com/coreos

[Service]
Type=notify
WorkingDirectory=/var/lib/etcd/
ExecStart=/usr/local/bin/etcd \
--name=master02 \
--cert-file=/etc/etcd/ssl/etcd.pem \
--key-file=/etc/etcd/ssl/etcd-key.pem \
--peer-cert-file=/etc/etcd/ssl/etcd.pem \
--peer-key-file=/etc/etcd/ssl/etcd-key.pem \
--trusted-ca-file=/etc/etcd/ssl/ca.pem \
--peer-trusted-ca-file=/etc/etcd/ssl/ca.pem \
--initial-advertise-peer-urls=https://192.168.100.20:2380 \
--listen-peer-urls=https://192.168.100.20:2380 \
--listen-client-urls=https://192.168.100.20:2379,http://127.0.0.1:2379 \
--advertise-client-urls=https://192.168.100.20:2379 \
--initial-cluster-token=etcd-cluster-0 \
--initial-cluster=master01=https://192.168.100.10:2380,master02=https://192.168.100.20:2380,master03=https://192.168.100.30:2380\
--initial-cluster-state=new \
--data-dir=/var/lib/etcd
Restart=on-failure
RestartSec=5
LimitNOFILE=65536

[Install]
WantedBy=multi-user.target
On Mmaster03
Create file /etc/systemd/system/etcd.service with the following content
[Unit]
Description=Etcd Server
After=network.target
After=network-online.target
Wants=network-online.target
Documentation=https://github.com/coreos

[Service]
Type=notify
WorkingDirectory=/var/lib/etcd/
ExecStart=/usr/local/bin/etcd \
--name=master03 \
--cert-file=/etc/etcd/ssl/etcd.pem \
--key-file=/etc/etcd/ssl/etcd-key.pem \
--peer-cert-file=/etc/etcd/ssl/etcd.pem \
--peer-key-file=/etc/etcd/ssl/etcd-key.pem \
--trusted-ca-file=/etc/etcd/ssl/ca.pem \
--peer-trusted-ca-file=/etc/etcd/ssl/ca.pem \
--initial-advertise-peer-urls=https://192.168.100.30:2380 \
--listen-peer-urls=https://192.168.100.30:2380 \
--listen-client-urls=https://192.168.100.30:2379,http://127.0.0.1:2379 \
--advertise-client-urls=https://192.168.100.30:2379 \
--initial-cluster-token=etcd-cluster-0 \
--initial-cluster=master01=https://192.168.100.10:2380,master02=https://192.168.100.20:2380,master03=https://192.168.100.30:2380\
--initial-cluster-state=new \
--data-dir=/var/lib/etcd
Restart=on-failure
RestartSec=5
LimitNOFILE=65536

[Install]
WantedBy=multi-user.target
Start etcd service
# systemctl daemon-reload && systemctl enable etcd && systemctl start etcd
Check ectd cluster status
# etcdctl --ca-file=/etc/etcd/ssl/ca.pem --cert-file=/etc/etcd/ssl/etcd.pem --key-file=/etc/etcd/ssl/etcd-key.pem cluster-health
Install Keepalived on All Master Nodes
The keepalived configuration file is located at /etc/keepalived/keepalived.conf. In this file , you need to replace KEEPALIVED_AUTH_PASS with your own password and make the password identical on all Master nodes, and change the interface item value to the server’s proper network interface name.
On Master01Install keepalived
# apt install keepalived
Create keepalived configu file /etc/keepalived/keepalived.conf with the following content
global_defs {
    router_id LVS_k8s
    }

    vrrp_script CheckK8sMaster {
        script "curl -k https://192.168.100.10:6443"
        interval 3
        timeout 9
        fall 2
        rise 2
    }

    vrrp_instance VI_1 {
        state BACKUP
        interface eth0
        virtual_router_id 61
        priority 80
        advert_int 1
        mcast_src_ip 192.168.100.10
        nopreempt
        authentication {
            auth_type PASS
            auth_pass KEEPALIVED_AUTH_PASS
        }
        unicast_peer {
            192.168.100.20
            192.168.100.30
        }
        virtual_ipaddress {
            192.168.100.60/24
        }
        track_script {
            CheckK8sMaster
        }

    }
Start keepalived
On Master02Install keepalived
apt install keepalived
Modify /etc/keepalived/keepalived.conf file to contain the following content
global_defs {
    router_id LVS_k8s
    }

    vrrp_script CheckK8sMaster {
        script "curl -k https://192.168.100.20:6443"
        interval 3
        timeout 9
        fall 2
        rise 2
    }

    vrrp_instance VI_1 {
        state BACKUP
        interface eth0
        virtual_router_id 61
        priority 80
        advert_int 1
        mcast_src_ip 192.168.100.20
        nopreempt
        authentication {
            auth_type PASS
            auth_pass  KEEPALIVED_AUTH_PASS
        }
        unicast_peer {
            192.168.100.10
            192.168.100.30
        }
        virtual_ipaddress {
            192.168.100.60/24
        }
        track_script {
            CheckK8sMaster
        }

    }
Start keepalived
# systemctl daemon-reload && systemctl enable keepalived && systemctl restart keepalived
On Master03
Install keepalived
# apt install keepalived
Create keepalived configuration file /etc/keepalived/keepalived.conf with the following content
global_defs {
    router_id LVS_k8s
    }

    vrrp_script CheckK8sMaster {
        script "curl -k https://192.168.100.30:6443"
        interval 3
        timeout 9
        fall 2
        rise 2
    }

    vrrp_instance VI_1 {
        state BACKUP
        interface eth0
        virtual_router_id 61
        priority 80
        advert_int 1
        mcast_src_ip 192.168.100.30
        nopreempt
        authentication {
            auth_type PASS
            auth_pass KEEPALIVED_AUTH_PASS
        }
        unicast_peer {
            192.168.100.10
            192.168.100.20
        }
        virtual_ipaddress {
            192.168.100.60/24
        }
        track_script {
            CheckK8sMaster
        }

    }
Start keepalived
# systemctl daemon-reload && systemctl enable keepalived && systemctl restart keepalived
Initiating Master Cluster
On Master01Create file kubeadm-config.yaml with following content
apiVersion: kubeadm.k8s.io/v1alpha1
kind: MasterConfiguration
api:
advertiseAddress: 192.168.100.10
etcd:
endpoints:
- https://192.168.100.10:2379
- https://192.168.100.20:2379
- https://192.168.100.30:2379
caFile: /etc/etcd/ssl/ca.pem
certFile: /etc/etcd/ssl/etcd.pem
keyFile: /etc/etcd/ssl/etcd-key.pem
networking:
podSubnet: 10.244.0.0/16
apiServerCertSANs:
- 192.168.100.10
- 192.168.100.20
- 192.168.100.30
- 192.168.100.60
apiServerExtraArgs:
endpoint-reconciler-type: lease
Run the following command to initiate Kubernetes Master services
# kubeadm init --config kubeadm-config.yaml
Copy pki files to all other master nodes
# scp -rp /etc/kubernetes/pki 192.168.100.20:/etc/kubernetes/
# scp -rp /etc/kubernetes/pki 192.168.100.30:/etc/kubernetes/
On Master02
Create file kubeadm-config.yaml with following content
apiVersion: kubeadm.k8s.io/v1alpha1
kind: MasterConfiguration
api:
advertiseAddress: 192.168.100.20
etcd:
endpoints:
- https://192.168.100.10:2379
- https://192.168.100.20:2379
- https://192.168.100.30:2379
caFile: /etc/etcd/ssl/ca.pem
certFile: /etc/etcd/ssl/etcd.pem
keyFile: /etc/etcd/ssl/etcd-key.pem
networking:
podSubnet: 10.244.0.0/16
apiServerCertSANs:
- 192.168.100.10
- 192.168.100.20
- 192.168.100.30
- 192.168.100.60
apiServerExtraArgs:
endpoint-reconciler-type: lease
Run the following command to initiate Kubernetes Master services
# kubeadm init --config kubeadm-config.yaml
On Master03
Create file kubeadm-config.yaml with following content
apiVersion: kubeadm.k8s.io/v1alpha1
kind: MasterConfiguration
api:
advertiseAddress: 192.168.100.30
etcd:
endpoints:
- https://192.168.100.10:2379
- https://192.168.100.20:2379
- https://192.168.100.30:2379
caFile: /etc/etcd/ssl/ca.pem
certFile: /etc/etcd/ssl/etcd.pem
keyFile: /etc/etcd/ssl/etcd-key.pem
networking:
podSubnet: 10.244.0.0/16
apiServerCertSANs:
- 192.168.100.10
- 192.168.100.20
- 192.168.100.30
- 192.168.100.60
apiServerExtraArgs:
endpoint-reconciler-type: lease
Run the following command to initiate Kubernetes Master services
# kubeadm init --config kubeadm-config.yaml
Configure Kuberctl on All Master Nodes
Execute the following command on all Master nodes
# mkdir -p /root/.kube
# cp -i /etc/kubernetes/admin.conf /root/.kube/config
Configure POD networking
On one of the masters run the following command:
# kubectl apply -f https://raw.githubusercontent.com/coreos/flannel/v0.10.0/Documentation/kube-flannel.yml
Joining Worker Nodes
Thanks for kubeadm, joining a Kubernetes worker node is as simple as running a command in console. The command line with the parameters and their value is what ‘kubeadm init’ execution returned in the previous step. You merely need to copy the command line and execute it on target servers.
Installing Other Supporting Components/Systems
Installing Kubernetes Dashboard
Create file dashboard.yaml with the following content
kind: ClusterRole
apiVersion: rbac.authorization.k8s.io/v1
metadata:
    name: ui-anonymous
rules:
- apiGroups:
    - ""
    resources:
    - services
    - services/proxy
    verbs:
    - '*'

---
apiVersion: rbac.authorization.k8s.io/v1
kind: RoleBinding
metadata:
    name: ui-anonymous-binding
    namespace: kube-system
roleRef:
    apiGroup: rbac.authorization.k8s.io
    kind: ClusterRole
    name: ui-anonymous
subjects:
- apiGroup: rbac.authorization.k8s.io
    kind: User
    name: system:anonymous

# ------------------- Dashboard Secret ------------------- #
---
apiVersion: v1
kind: Secret
metadata:
    labels:
    k8s-app: kubernetes-dashboard
    name: kubernetes-dashboard-certs
    namespace: kube-system
type: Opaque

---
# ------------------- Dashboard Service Account ------------------- #

apiVersion: v1
kind: ServiceAccount
metadata:
    labels:
    k8s-app: kubernetes-dashboard
    name: kubernetes-dashboard
    namespace: kube-system

---
# ------------------- Kubernetes-dashboard Clusterrolebind------------#
apiVersion: rbac.authorization.k8s.io/v1beta1
kind: ClusterRoleBinding
metadata:
    name: kubernetes-dashboard
    labels:
    k8s-app: kubernetes-dashboard
roleRef:
    apiGroup: rbac.authorization.k8s.io
    kind: ClusterRole
    name: cluster-admin
subjects:
- kind: ServiceAccount
    name: kubernetes-dashboard
    namespace: kube-system

---
# ------------------- Dashboard Role & Role Binding ------------------- #

kind: Role
apiVersion: rbac.authorization.k8s.io/v1
metadata:
    name: kubernetes-dashboard-minimal
    namespace: kube-system
rules:
    # Allow Dashboard to create 'kubernetes-dashboard-key-holder' secret.
- apiGroups: [""]
    resources: ["secrets"]
    verbs: ["create"]
    # Allow Dashboard to create 'kubernetes-dashboard-settings' config map.
- apiGroups: [""]
    resources: ["configmaps"]
    verbs: ["create"]
    # Allow Dashboard to get, update and delete Dashboard exclusive secrets.
- apiGroups: [""]
    resources: ["secrets"]
    resourceNames: ["kubernetes-dashboard-key-holder", "kubernetes-dashboard-certs"]
    verbs: ["get", "update", "delete"]
    # Allow Dashboard to get and update 'kubernetes-dashboard-settings' config map.
- apiGroups: [""]
    resources: ["configmaps"]
    resourceNames: ["kubernetes-dashboard-settings"]
    verbs: ["get", "update"]
    # Allow Dashboard to get metrics from heapster.
- apiGroups: [""]
    resources: ["services"]
    resourceNames: ["heapster"]
    verbs: ["proxy"]
- apiGroups: [""]
    resources: ["services/proxy"]
    resourceNames: ["heapster", "http:heapster:", "https:heapster:"]
    verbs: ["get"]

---
apiVersion: rbac.authorization.k8s.io/v1
kind: RoleBinding
metadata:
    name: kubernetes-dashboard-minimal
    namespace: kube-system
roleRef:
    apiGroup: rbac.authorization.k8s.io
    kind: Role
    name: kubernetes-dashboard-minimal
subjects:
- kind: ServiceAccount
    name: kubernetes-dashboard
    namespace: kube-system

---
# ------------------- Dashboard Deployment ------------------- #

kind: Deployment
apiVersion: apps/v1beta2
metadata:
    labels:
    k8s-app: kubernetes-dashboard
    name: kubernetes-dashboard
    namespace: kube-system
spec:
    replicas: 1
    revisionHistoryLimit: 10
    selector:
    matchLabels:
        k8s-app: kubernetes-dashboard
    template:
    metadata:
        labels:
        k8s-app: kubernetes-dashboard
    spec:
        containers:
        - name: kubernetes-dashboard
        image: k8s.gcr.io/kubernetes-dashboard-amd64:v1.8.3
        ports:
        - containerPort: 8443
            protocol: TCP
        args:
            - --auto-generate-certificates
            # Uncomment the following line to manually specify Kubernetes API server Host
            # If not specified, Dashboard will attempt to auto discover the API server and connect
            # to it. Uncomment only if the default does not work.
            # - --apiserver-host=http://my-address:port
        volumeMounts:
        - name: kubernetes-dashboard-certs
            mountPath: /certs
            # Create on-disk volume to store exec logs
        - mountPath: /tmp
            name: tmp-volume
        livenessProbe:
            httpGet:
            scheme: HTTPS
            path: /
            port: 8443
            initialDelaySeconds: 30
            timeoutSeconds: 30
        volumes:
        - name: kubernetes-dashboard-certs
        secret:
            secretName: kubernetes-dashboard-certs
        - name: tmp-volume
        emptyDir: {}
        serviceAccountName: kubernetes-dashboard
        # Comment the following tolerations if Dashboard must not be deployed on master
        tolerations:
        - key: node-role.kubernetes.io/master
        effect: NoSchedule

---
# ------------------- Dashboard Service ------------------- #

kind: Service
apiVersion: v1
metadata:
    labels:
    k8s-app: kubernetes-dashboard
    name: kubernetes-dashboard
    namespace: kube-system
spec:
    ports:
    - port: 443
        targetPort: 8443
    selector:
k8s-app: kubernetes-dashboard
Execute the following command in console
# kubectl create -f dashboard.yaml
Installing Helm
The installation can be done on any Master node
Create file helm-rbac.yaml as helm RBAC file with following content
apiVersion: v1
kind: ServiceAccount
metadata:
    name: tiller
    namespace: kube-system
---
apiVersion: rbac.authorization.k8s.io/v1
kind: ClusterRoleBinding
metadata:
    name: tiller-cb
roleRef:
    apiGroup: rbac.authorization.k8s.io
    kind: ClusterRole
    name: cluster-admin
subjects:
    - kind: ServiceAccount
    name: tiller
namespace: kube-system
Exec the following command
# kubectl create -f helm-rbac.yaml
# wget https://storage.googleapis.com/kubernetes-helm/helm-v2.9.1-linux-amd64.tar.gz
# tar -zxvf helm-v2.9.1-linux-amd64.tar.gz
# cp linux-amd64/helm /usr/local/bin/

#apt install socat -y
Helm init --service-account tiller --tiller-namespace kube-system
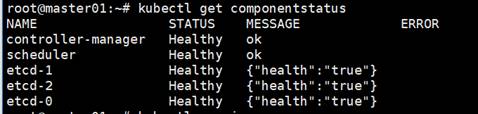
Verifying Cluster
Check Kubernetes version

Check Kubernetes components status
# kubectl get componentstatus
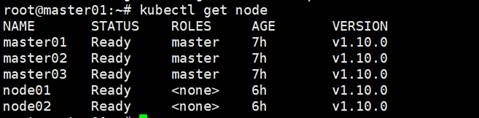
Check the node status
# kubectl get node
Open https://192.168.100.60:6443/api/v1/namespaces/kube-system/services/https:kubernetes-dashboard:/proxy in your browser and select Token option
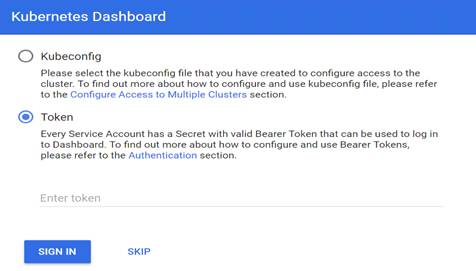
Retrieve dashboard token by running following command on one of Master nodes.
# Dashboard_Secret=`kubectl get secret -n kube-system|grep kubernetes-dashboard-token|awk '{print $1}'`
# kubectl describe secret -n kube-system ${Dashboard_Secret} |sed -n '$p'|awk '{print $NF}'


Congratulations!
Now you have a full-function working Kubernetes cluster. You can explore our other solutions if you want to know more.