How to Auto Deploy a Multi-Nodes Highly Available (HA) Kubernetes Cluster with Ansible
Kubernetes is one of the most popular open-source and enterprise-ready container orchestration systems. It’s used to automate the deployment, scaling, and management of containerized applications. Manual Kubernetes installation is a laborious and error-prone process. However, it can be dramatically simplified by using configuration management tools such as Ansible. This article introduces how to deploy a full-function Kubernetes cluster on our bare-metal servers using Ansbile with our open-source installation package. The process is also applicable for your environment with changing of configurations.
Prerequisites
- The cluster requires at least 4 servers, bare-metal or virtual, with Ubuntu 16.04 LTS or CentOS/RHEL 7 installed.
- All servers are in the same network and able to see each other.
- An Ansible Server has to be setup in the same network with Ansible v2.4 (or later) and python-netaddr installed.
- Internet access is available for all servers to download software binaries.
- Password-less SSH has to be enabled for the root user on all servers except the Ansible Server
- Root user remote login has to be enabled on all servers except the Ansible Server.
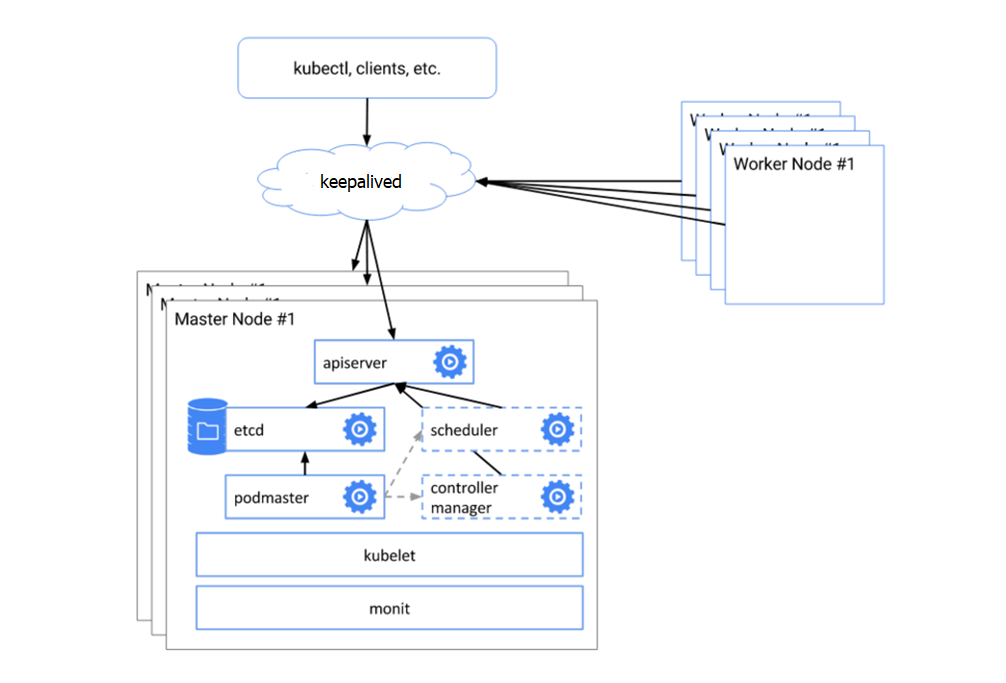
Architecture
Below is our example Kubernetes cluster architecture which consists of 5 bare-metal servers with an internal network.
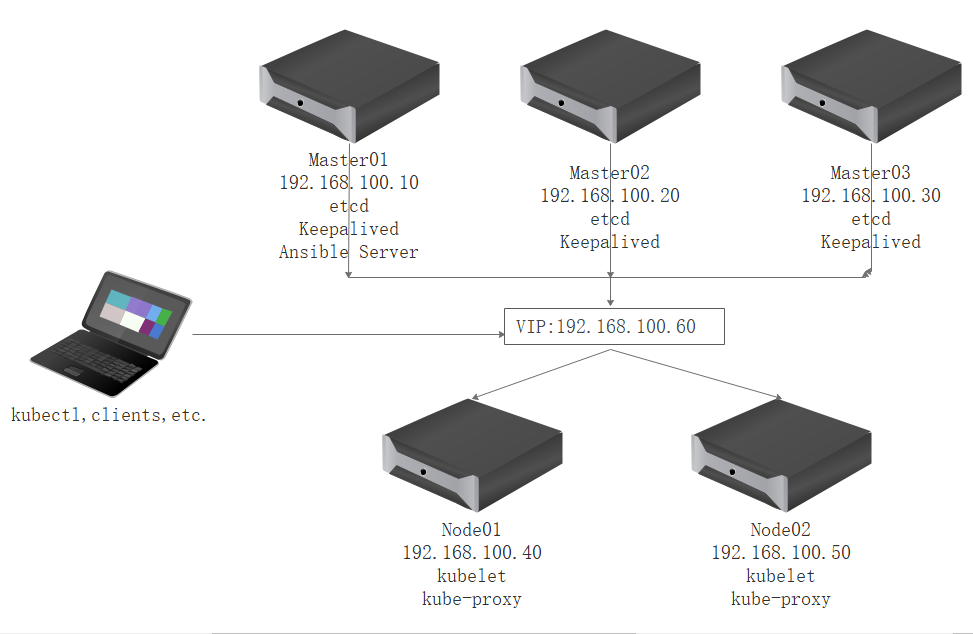
Below is our example Kubernetes cluster architecture which consists of 5 bare-metal servers with an internal network.
The Kubernetes cluster depends on the following software components:
- Kubernetes v1.10.0
- Etcd v3.3.4
- Docker v17.03
- Calico v3.1.3
- Flannel v0.10.0
- Helm v2.9.1
- Nginx-ingress-controller v0.14.0
- Prometheus v2.3.2
Preparing and Deploying Kubernetes Cluster
Install Python2.7 and enable root user
Ubuntu 16:
1.Install python2.7
kuber$ sudo apt update
kuber$ sudo apt install python2.7 -y
kuber$ sudo ln -s /usr/bin/python2.7 /usr/bin/python
2.Enable root user
kuber$ sudo passwd root
kuber$ sudo sed -i 's/prohibit-password/yes/' /etc/ssh/sshd_config
kuber$ sudo service ssh restart
For Centos 7:
1.Install python2.7
root# yum install epel-release -y
root# yum update -y
root# yum install python -y
In Centos7, root user has been enabled by default.
Install Ansible Server on Master01
Ubuntu 16:
kuber$ sudo apt-get install git python-pip -y
kuber$ pip install pip --upgrade
kuber$ pip install --no-cache-dir ansible
You might encounter the following error
Traceback (most recent call last):
File "/usr/bin/pip", line 9, in <module>
    from pip import main
ImportError: cannot import name main
A quick fix is to modify /usr/bin/pip, finding the following section
from pip import main
if __name__ == '__main__':
sys.exit(main())
and replacing it with
from pip import __main__
if __name__ == '__main__':
sys.exit(__main__._main())
Re-run the command
kuber$ sudo pip install --no-cache-dir ansible
For CentOS 7:
root# yum install git python-pip -y
root# pip install pip --upgrade
root# pip install --no-cache-dir ansible
Enable password-less SSH
Since Ansible does not prompt for passwords, you must generate SSH keys on the Ansible Server and distribute the public key to other servers. You can use any server on the same network as Ansble Server. We setup Ansible Server on Master0.
root# ssh-keygen -t rsa -b 2048

root# ssh-copy-id 192.168.100.10
root# ssh-copy-id 192.168.100.20
root# ssh-copy-id 192.168.100.30
root# ssh-copy-id 192.168.100.40
root# ssh-copy-id 192.168.100.50
Download installation package and modify Ansible inventory file
Download ha-k8s-ansible.tar.gz and unpack it into /etc folder
root# tar -zxvf ha-k8s-ansible.tar.gz -C /etc/
The following is our Ansbile inventory file. If using it in a different architecture, you need to change the servers’ IP, VIP and INTERFACE parameters’ value. If you prefer Calico as your network provider, you can change the value of ‘network_plugin’ to ‘calico’.
# Kubernetes nodes
[first-master]
192.168.100.10 node_name=master01

[other-master]
192.168.100.20 node_name=master02
192.168.100.30 node_name=master03

[kube-node]
192.168.100.40_name=node01
192.168.100.50 node_name=node02

[lb-etcd]
192.168.100.10 if="INTERFACE" lb_role=master priority=100 node_name=master01
192.168.100.20 if="INTERFACE" lb_role=backup priority=90 node_name=master02
192.168.100.30 if="INTERFACE" lb_role=backup priority=80 node_name=master03


[all:vars]
#Master Node Hosts Bind
master01="192.168.100.10"
master02="192.168.100.20"
master03="192.168.100.30"

# Kubernetes API Server
keepalived_vip="192.168.100.60"

kube-apiserver="https://{{ keepalived_vip }}:6443"

# etcd nodes
tmp_nodes="{% for h in groups['lb-etcd'] %}{{ hostvars[h]['node_name'] }}=https://{{ h }}:2380,{% endfor %}"
etcd_nodes="{{ tmp_nodes.rstrip(',') }}"

# etcd endpoints
tem_endpoints="{% for h in groups['lb-etcd'] %}https://{{ h }}:2379,{% endfor %}"
etcd_endpoints="{{ tem_endpoints.rstrip(',') }}"

# Network plugin (calico or flannel)
network_plugin="flannel"

# Pod network
pod_network="10.244.0.0/16"

bin_dir="/usr/local/bin"

# Ansible working directory
base_dir="/etc/ansible"

# The etcd certificates directory on kubernetes master nodes
etcd_ca_dir="/etc/kubernetes/pki/etcd"

# Docker version
docker_version="v17.03.2-ce"

# etc version
etcd_version="v3.3.4"

# Kubernetes version
k8s_version_ubuntu="1.10.0-00"
k8s_version_centos="1.10.0-0"

# Helm version
helm_version="v2.9.1"

# The certificates directory on frist master node
cert_generate_dir="/opt/ssl"

# Kubernetes apps yaml directory
yaml_dir="/root/.kube/kube-apps"

# Kubernetes certificates directory
kube_cert_dir="/etc/kubernetes/pki"

# Kubernetes config path
kube_config_dir="/etc/kubernetes"
Deploy the Kubernetes cluster
It’s ready to deploy a full-function high-available Kubernetes cluster with 2 Nodes. Execute the following command on Master01, aka our Ansible Server. The process will take some time depending on your network and servers configuration. Now it’s time to have a break for you . You can walk away and have a cup of coffee.
root# cd /etc/ansible
root# ansible-playbook deploy.yml
Verifying Installation
Verifying by command line
On Master0, run ‘kubectl version’ in console to view Kebernetes version

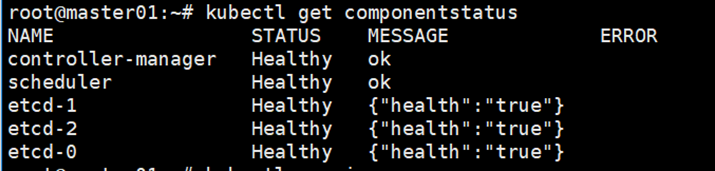
On Master0, run ‘kubectl get componentstatus’ in console to check the status of Kubernetes components
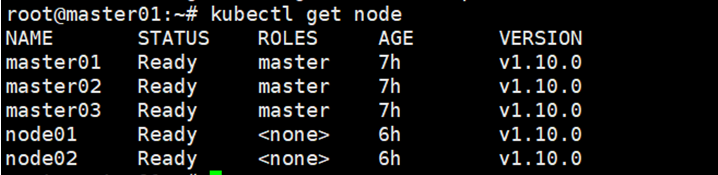
Run ‘kubectl get node’ to view the node status
Run ‘kubectl get pod –all-namespaces’ to get status of all pods

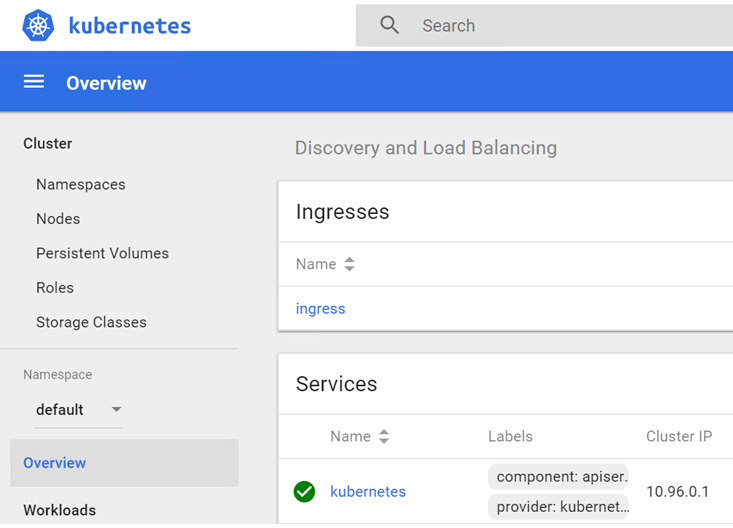
Verifying in Kubernetes dashboard
Open https://192.168.100.60:6443/api/v1/namespaces/kube-system/services/https:kubernetes-dashboard:/proxy in your browser and select Token option
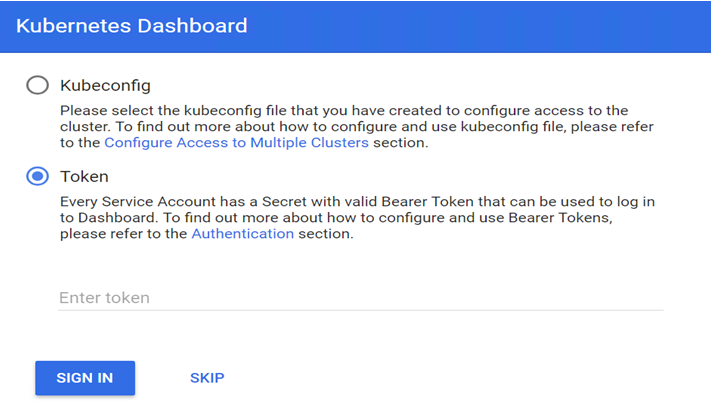
The Dashboard token can be retrieved by running the following command
root# Dashboard_Secret=`kubectl get secret -n kube-system|grep kubernetes-dashboard-token|awk '{print $1}'`
root# kubectl describe secret -n kube-system ${Dashboard_Secret} |sed -n '$p'|awk '{print $NF}'

Congratulations!
Now you have a full-function working Kubernetes cluster. You can explore our other solutions if you want to know more.